

Restoring the interior of classic cars is a rewarding endeavor that allows enthusiasts to breathe new life into vintage automobiles. It not only enhances the aesthetic appeal but also preserves the original charm and character that defines these timeless machines. This process, while seemingly daunting, can be simplified with the right approach and tools.
Understanding the Basics of classic car interiors is crucial before embarking on any restoration project. Key components such as upholstery, dashboard, and flooring need careful attention. Each element plays a significant role in the overall look and feel of the vehicle, making it essential to assess their condition before starting the restoration process.
In this article, we will provide a comprehensive guide that breaks down the steps necessary for a successful interior restoration. From selecting the right materials to applying effective techniques, our aim is to equip you with the knowledge required to tackle this project with confidence. Whether you are a seasoned restorer or a novice, achieving a high-quality finish on your classic car’s interior is within reach.
Join us as we explore the various stages of restoring classic car interiors, emphasizing the importance of careful planning, attention to detail, and the enjoyment that comes with reviving a piece of automotive history.
Choosing the Right Materials for Upholstery and Trim
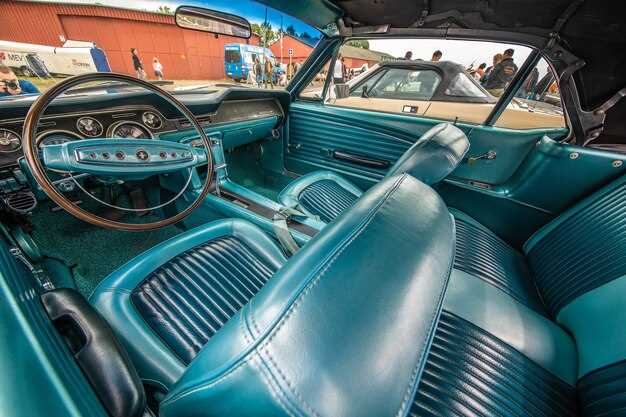
Selecting the appropriate materials for upholstery and trim is crucial when restoring classic cars, as it directly impacts both aesthetics and durability. The right choice can enhance the vehicle’s value and authenticity, while the wrong materials can detract from its classic appeal.
First and foremost, consider the original materials used in the car. Researching factory specifications helps ensure that the restoration remains true to the vehicle’s heritage. Often, manufacturers used high-quality leather, vinyl, or specific fabrics that reflected the period’s design trends and durability standards.
Leather remains a popular choice due to its durability and luxurious feel. It ages gracefully and can be repaired easily, making it ideal for restorations. However, it is essential to distinguish between genuine leather and synthetic alternatives; the latter may offer better resistance to wear but lack the authentic look and feel of real leather.
Vinyl is another common material for upholstery, particularly in classic cars from the mid-20th century. It is less expensive than leather and can mimic various textures and colors. When choosing vinyl, opt for high-quality versions that are UV-resistant and easy to clean to ensure longevity.
Fabrics such as tweed, mohair, and velvet were often used in luxury models. Selecting a fabric should involve consideration of usage; for example, tweed is durable and provides a classic look, while velvet offers a rich appearance but may be more susceptible to wear.
In addition to the primary upholstery materials, trim components such as carpets, headliners, and door panels also require careful selection. Carpet materials should be durable and able to withstand foot traffic, while headliner fabrics should be lightweight and maintain their shape over time. Be sure to match the color and texture with the chosen upholstery material to create a cohesive look.
Another factor to consider is weather resistance, especially for cars that will see occasional outdoor exposure. Choosing materials that can withstand moisture and temperature changes will ensure that the interior remains in great condition for years to come.
Lastly, always source materials from reputable suppliers who specialize in classic car restorations. This guarantees that the materials will meet the specific needs of classic vehicles and maintain authenticity throughout the restoration process.
Step-by-Step Guide to Refurbishing Dashboards and Consoles
Refurbishing the dashboard and console of a classic car can significantly enhance its aesthetic appeal and market value. This guide outlines a systematic approach to effectively restore these vital components.
1. Gather Necessary Tools and Materials
Before starting, ensure you have the following tools: a screwdriver set, plastic trim removal tools, a heat gun or hairdryer, sandpaper (various grits), spray paint or vinyl dye, adhesive, and a soft cloth. Additionally, gather any replacement parts, such as gauges or knobs, if required.
2. Remove the Dashboard
Start by disconnecting the car battery for safety. Use a screwdriver to remove screws holding the dashboard in place. Carefully detach any wiring connected to gauges, lights, or audio systems. Utilize plastic trim removal tools to avoid damaging surrounding areas while prying off the dashboard.
3. Clean the Surface
Once the dashboard is removed, clean it thoroughly with a soft cloth and an appropriate cleaner to remove dirt, grease, and old polish. This step is crucial for ensuring proper adhesion of new coatings.
4. Sand the Surface
Use sandpaper to carefully scuff the existing surface of the dashboard. Start with a medium grit and finish with finer grit to create a smooth surface. This process helps new paint or dye adhere better.
5. Repair Any Damage
Inspect the dashboard for cracks or imperfections. For minor cracks, apply an appropriate plastic filler or epoxy, then sand once dry for a seamless finish. Larger damages may require replacement parts.
6. Paint or Dye the Dashboard
Choose a spray paint or vinyl dye that matches the original color or the desired finish. Apply in several light coats, allowing adequate drying time between applications. This will prevent drips and ensure an even coat.
7. Reattach Gauges and Components
Once the paint or dye is fully cured, reinstall any gauges, knobs, or other components. Ensure everything is securely connected, and double-check that all wiring is properly shielded and insulated.
8. Reinstall the Dashboard
Carefully align the dashboard back into its original position. Reattach using the screws removed earlier. Ensure that all components, wiring, and connections are tidy and secure.
9. Test Functionality
Before reconnecting the battery, verify that all components fit correctly and are properly aligned. Once satisfied, reconnect the battery and test all functionalities to confirm everything operates as expected.
10. Final Touches
Inspect your work for any missed spots or imperfections. Consider applying a leather conditioner or protectant on any leather components for added longevity. Clean the surrounding areas of the console to complete the refurbishment.
Following these systematic steps will help you successfully refurbish your classic car’s dashboard and console, restoring both functionality and beauty.
Tips for Reupholstering Seats and Improving Comfort

Reupholstering seats is an essential aspect of restoring classic cars, enhancing both aesthetics and comfort. Here are some practical tips to help you achieve the best results.
- Choose Quality Materials: Select upholstery materials that are durable, easy to clean, and appropriate for your car’s style. Consider options like leather, vinyl, or high-quality fabric.
- Assess Seat Structure: Before reupholstering, inspect the seat frame and foam padding. Replace or repair any damaged components to ensure optimal support and comfort.
- Take Accurate Measurements: Measure the existing fabric carefully to ensure you purchase the correct amount of material. Include extra for seams and design elements.
- Decide on Padding: Depending on the original condition, you might want to add extra padding. High-density foam can significantly enhance comfort levels.
- Use a Stapler or Hog Rings: Secure the new upholstery tightly using a pneumatic stapler or hog rings to avoid sagging and wrinkles in the fabric.
- Follow Original Patterns: If possible, use the original upholstery patterns as a guide. This helps maintain the classic look and ensures a snug fit.
By following these tips, you can successfully reupholster your classic car’s seats, improving comfort while preserving the vehicle’s charm. A well-done upholstery job not only enhances your driving experience but also contributes to the overall value of your classic car.