

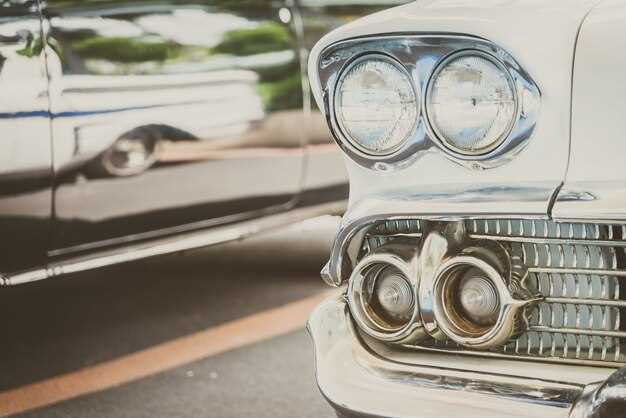
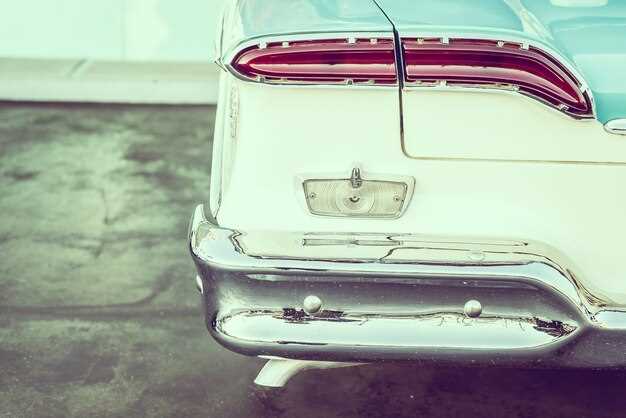
Restoring classic cars is a labor of love, and one of the most visually impactful aspects of these vehicles is their chrome and trim components. Over time, these elements can suffer from tarnish, rust, and pitting, detracting from the overall appearance of your prized possession. This article will provide you with essential tips on how to effectively restore chrome and trim, ensuring that your classic car shines as brightly as it did on the showroom floor.
Understanding the Materials is crucial when embarking on a restoration project. Chrome plating is not just for aesthetics; it serves a protective function against corrosion. Trim pieces may be made from various materials, including stainless steel, aluminum, and plastic, each requiring specific care. Knowing the materials involved will guide you toward the most effective restoration techniques.
Cleaning is the first step in the restoration process. Grit and grime can cause further damage if not adequately removed. Using a mild soap and water solution along with non-abrasive materials will help you avoid scratching the chrome or trim. After cleaning, assess the condition of the parts to determine the need for deeper restoration methods.
Once you’ve established a clean surface, you can delve into polishing and restoration techniques. For chrome elements, a good-quality chrome polish can rejuvenate the shine without damaging the plating. In cases of severe corrosion, you may need to use specific tools or techniques, such as buffing wheels or chemical rust removers, to restore the original luster.
Choosing the Right Tools for Chrome Restoration
Restoring chrome trim on classic cars requires specific tools to achieve the best results without damaging the metal. The right selection of tools will help you clean, polish, and protect chrome surfaces effectively.
First, start with a quality set of cleaning tools. Soft microfiber towels are essential to avoid scratching the chrome surface during the cleaning process. A non-abrasive sponge can also be useful for initial dirt removal. Use a gentle, pH-balanced car wash soap to prevent damaging the chrome finish.
For rust and corrosion removal, a set of fine steel wool or brass wool is recommended. Steel wool grades #0000 are ideal because they are gentle enough to avoid scratches on chrome while effectively removing surface rust. Additionally, you may want to use specialized chrome cleaners that are formulated to remove oxidation without harming the finish.
When it comes to polishing, invest in a quality polishing machine along with a selection of foam and wool pads. A variable-speed polisher allows better control, reducing the risk of burning the chrome. Use a fine chrome polish to enhance shine and protect the finish; applying it with a soft applicator pad ensures even coverage.
Finishing touches are crucial, so consider using a high-quality wax designed specifically for chrome surfaces. This will protect against future tarnishing and enhance the visual appeal of your trim. A soft cloth or foam applicator should be used to apply the wax evenly.
Lastly, a set of detail brushes can help clean intricate areas and tight spaces around the chrome trim. Look for brushes with soft bristles to avoid scratching. Combining these tools will create a comprehensive kit that will significantly streamline the chrome restoration process on your classic car.
Step-by-Step Process for Polishing Chrome
Polishing chrome on a classic car enhances its appearance and protects against rust. Follow these steps to achieve a brilliant shine.
Step 1: Gather Supplies
Collect necessary supplies, including chrome polish, microfiber cloths, a soft-bristled brush, a bucket of warm soapy water, and a clean sponge. If available, use a chrome polishing wheel for larger surfaces.
Step 2: Clean the Chrome
Begin by washing the chrome surfaces with warm soapy water and a sponge to remove dirt and grime. Rinse thoroughly with clean water and dry with a microfiber cloth to prevent water spots.
Step 3: Inspect the Surface
Examine the chrome for any signs of rust, pitting, or scratches. For minor rust, consider using a rust remover before polishing. This pre-treatment will enhance the polishing process.
Step 4: Apply Chrome Polish
Using a clean microfiber cloth, apply a small amount of chrome polish. Work in small sections to ensure even coverage. Use a circular motion to spread the polish, allowing it to penetrate and bond with the surface.
Step 5: Buff the Surface
After applying the polish, take another clean microfiber cloth and buff the surface. Use a different section of the cloth for each pass to avoid reapplying dirt. Continue buffing until you achieve the desired shine.
Step 6: Repeat as Necessary
If the chrome still appears dull, repeat Steps 4 and 5. For heavily tarnished pieces, multiple applications may be necessary to restore the finish fully.
Step 7: Final Wipe Down
After achieving the shine, give the chrome a final wipe down with a clean, dry microfiber cloth to remove any leftover polish residue. This will ensure a smooth and reflective surface.
Step 8: Regular Maintenance
To maintain the shine, periodically clean the chrome with mild soap and water. Apply a thin layer of chrome polish every few months to protect it from environmental damage.
Maintaining and Protecting Restored Trim
Once you have successfully restored the chrome and trim of your classic car, it’s essential to implement a regular maintenance routine to keep everything looking pristine. Regular cleaning should be done using a soft cloth and a gentle automotive soap. Avoid abrasive materials that can scratch the surface, and always dry the trim thoroughly to prevent water spots.
Consider applying a high-quality automotive wax specifically designed for chrome and metal surfaces. This creates a protective barrier against oxidation, corrosion, and environmental contaminants like dirt and road salt. Waxing should be performed every three months, or more frequently if the car is exposed to harsh weather conditions.
For deeper scratches or tarnish that may appear over time, utilize a chrome polish. Always follow the manufacturer’s instructions and test the product in a small, inconspicuous area first. This ensures compatibility with your restored finish.
Inspect the trim regularly for signs of wear or damage. Early detection of rust or peeling paint can save time and money in repairs. Keeping the chrome and trim covered when the vehicle is not in use can also minimize exposure to elements that cause deterioration.
Lastly, store the vehicle in a controlled environment, preferably a garage, to protect it from extreme temperatures and humidity. The right conditions can significantly extend the lifespan of restored trim and keep it looking like new for years to come.